Overview
This assignment will help you understand the impact that assembly instruction have on the registers and memory. It requires you to implement several functions within the context of a program that simulates the behavior of register and memory. The functions you need to implement focus on different instructions that we have most recently studied. In particular:
-
Assembly Instructions: You are to implement functions that require you to maintain registers and memory to implement the assembly interpreter. The instructions includes MOVL, ADDL, PUSHL, POPL, CMPL, CALL, and RET. Knowledge from previous lab assignments will help here!
-
Program Counter: You are to update the program counter for each instruction execution.
-
Assembly Simulation: You are to implement a simulater that runs instructions based on the address stored in the program counter (EIP).
Learning Objectives
-
To understand how each assembly instruction works with registers and memory.
-
To understand how program counter is updated after executing each instruction.
Getting Started
To get started, follow these steps:
- Download the starter code.
- Unzip the
project.zipwith the following commandunzip -d PROJECT project.zip. This will create a new directory calledPROJECT. You can replacePROJECTwith a directory name of your choice. cdinto thePROJECTdirectory and investigate the project.
If you follow the above steps correctly, you should have the following folder structure after unzipping (assuming the project name is “PROJECT”):
PROJECT/
  include/
  lib/
  obj/
  src/
  test/
  Makefile
After you have the code extracted you should go ahead and
investigate. You can run make from the command line and your
project will build and produce potential error results. See more
information below.
Code Structure
This exercise contains the following important folders:
- include: This is where we keep C/C++ header files. Header files are used in C/C++ to share definitions across many C/C++ source files.
- lib: This is where we keep any libraries that we might use. It will often be empty.
- obj: This folder is used for object files that are generated from the C compilation process. This folder is initially empty until you compile your code.
- src: This is the source folder where all code you are submitting must go. You can change anything you want in this folder (unless otherwise specified in the problem description and in the code we provide), you can add new files, etc.
- test: This is the test folder where you can find all of the public unit tests - if any are given.
- Makefile - this is a “build” file. This file is used to compile your code.
Compiling The Code
To compile the code in this assignment you must run the following command:
$ make
The make command will run the C++ compiler to build a program
executable and a test executable. These are
often referred to as program binaries in Unix/Linux terminology.
In addition, the make command will produce a submission.zip every
time you run it. The submission.zip file is what you upload to
Gradescope to submit your solution. See submission instructions below.
Compiling This Project
This project will produce a couple of executables including:
assembly_app: this is the main executable allowing you to run the program that you must complete successfully. The source code is src/main.c.assembly_test: this is the test executable that will run tests on the code your write for this exercise. The source code is test/test.cpp.
Testing The Code
After you have successfully compiled the code using make you can run
the test executable. Here is an example of what it looks like to run a
test executable:
$ ./hello_test
[==========] Running 2 tests from 1 test suite.
[----------] Global test environment set-up.
[----------] 2 tests from sum_test
[ RUN      ] sum_test.test_sum_positive
[       OK ] sum_test.test_sum_positive (0 ms)
[ RUN      ] sum_test.test_sum_negative
[       OK ] sum_test.test_sum_negative (0 ms)
[----------] 2 tests from sum_test (0 ms total)

[----------] Global test environment tear-down
[==========] 2 tests from 1 test suite ran. (2 ms total)
[  PASSED  ] 2 tests.
The tests that are provided are a subset of the tests that the autograder will run. However, it gives you a good idea if you are on the right track.
To test assembly instruction in the test folder, you can run assembly_app with the trace.
./assembly_app test/movl_register.txt
Instructions
You already know how to deal with C code, so we’ll make things a bit
easier for you – all of the modifications you have to do are going
to be in src/interpreter.c!
In this project, you will need to review the course materials for each instructions to be implemented. You will also need to handle each potential error for each instructions.
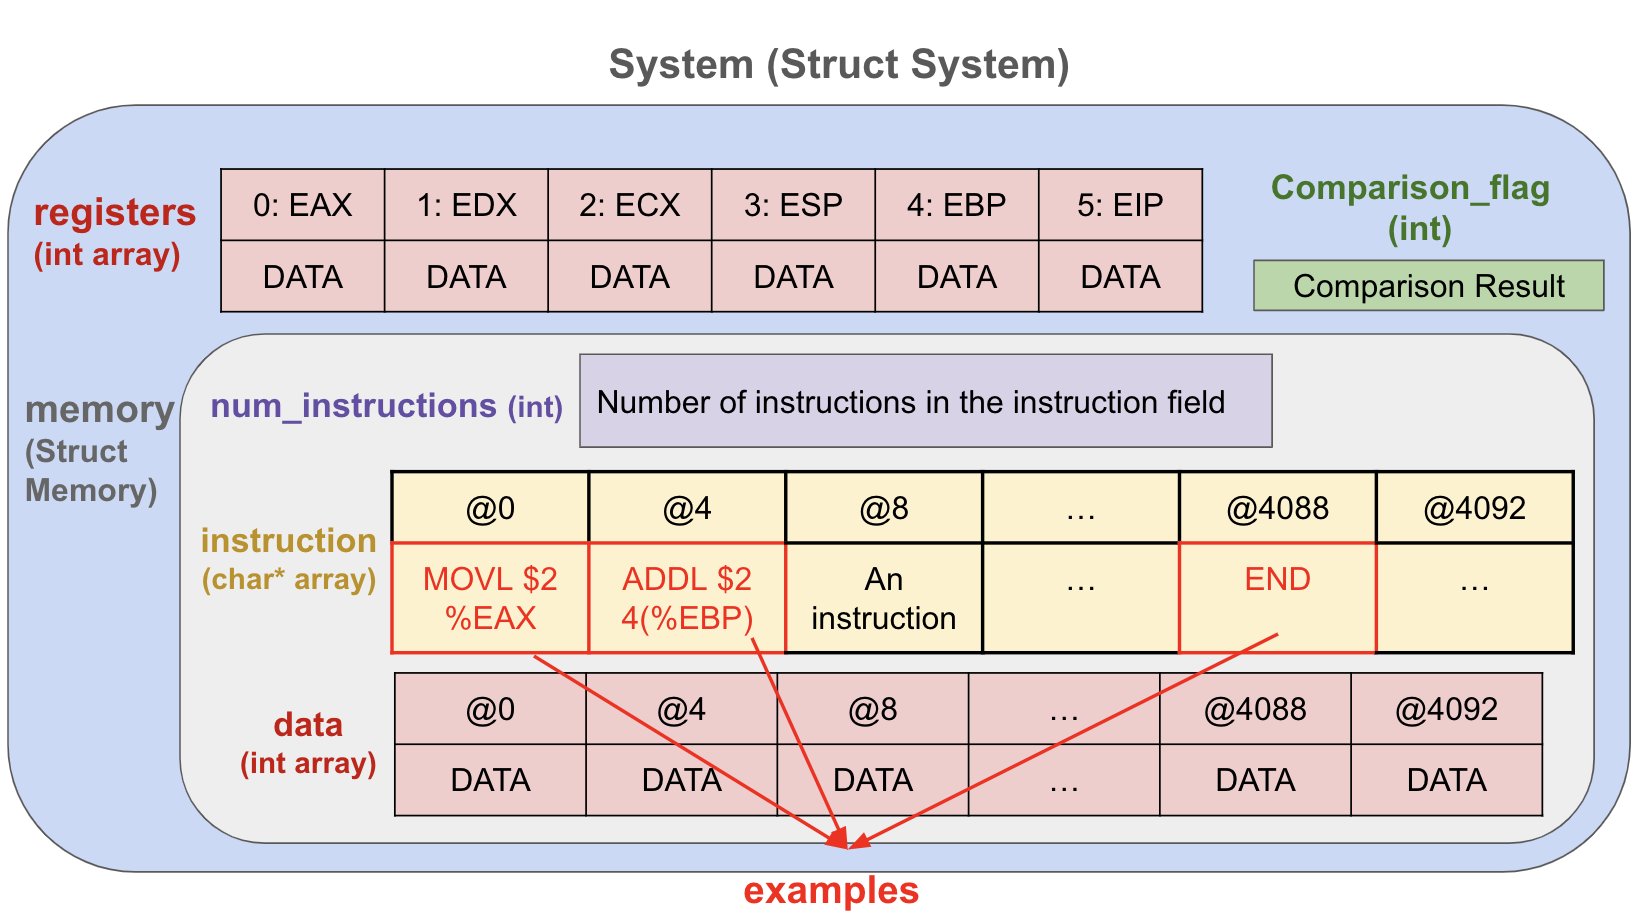
Take a look in include/interpreter.h, take note of the System struct and Memory.
In the Memory struct, we use one array to store instructions and another array to store memory data.
Here is an explanation for each field of Memory:
- num_instructions: number of instructions stored in the instruction array.
- instruction: an array that stores all the assembly instructions. It is a 4096-byte array. Since each instruction in 32-bit machine occupies 4 bytes, the memory address should be divided by 4 to obtain the index corresponding to the desired instruction.
- data: an array stores all the memory data. It is 4096-byte array. Since each int occupies 4 bytes, the memory address should be divided by 4 to obtain the index corresponding to the desired data.
In the System struct, there are three fields:
- registers: the array stores register data in the following 6 registers:
EAX,EDX,ECX,ESP,EBP, andEIP. TheEIPregister represents the program counter. - memory: a
Memorystruct data that contains both instructions and memory data. - comparison_flag: the variable used to support CMPL instructions.
Part 1: Understand The Code
We provide you with starter code for this assignment. Your first task is to read through interpreter.c and interpreter.h files in detail so you understand the structure of the code.
interpreter.h
you should review those enum types and understand how to use them
interpreter.c
get_memory_type: it is important to review and understand this function before moving forward to the following parts. For most of the functions you will implement, this function will be extremely useful. The function serves as a useful tool to process operands for most of assembly instructions in part 2.get_addr_from_label: a useful helper function to support label search. It will be useful for jump and call instructions.
Part 2: Implement Functions for Each Assembly Instruction of Move/Arithmetic operation
The second part of this assignment is to write the following functions in the file src/interpreter.c.
-
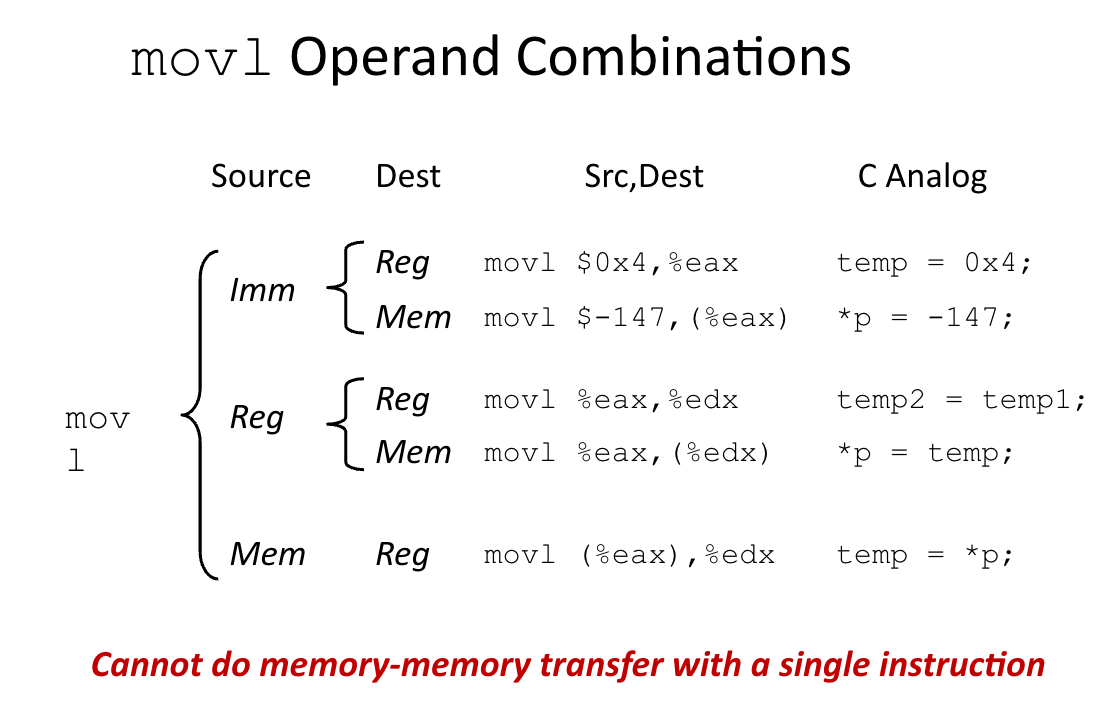
execute_movl: this function validates and executes a movl instruction, ensuring source and destination operands are of known and appropriate types, and then performs the move operation if valid.-
Please review the following slides for mov details.
- The parameters of this function are:
- A reference of the system desribed above.
- A string representing the source operand. This could be a register name, memory address, or immediate value.
- A string representing the destination operand. This could be a register name or memory address.
- It updates registers and/or memory, and returns
SUCCESSif there is no error.- Review the inline comments in the function for detailed explanations of each potential error status and return value.
- Example: assuming the value of eax and edx register is 0 and 100 in
sys,execute_movl(&system, "%EAX", "-4(%EDX)")will copy the value of eax to the memory insyswith memory address 96 (edx-4). In this case,sys.memory.data[24]will be updated to 0.
-
-
execute_addl: this function validates and executes a addl instruction, ensuring source and destination operands are of known and appropriate types, and then performs the add operation if valid. This function is similar toexecute_movlexcept this function does not copy but add the value of the source operand to the destination operand.- The parameters of this function are:
- A reference of the system desribed above.
- A string representing the source operand. This could be a register name, memory address, or immediate value.
- A string representing the destination operand. This could be a register name or memory address.
- It updates registers and/or memory, and returns
SUCCESSif there is no error.- Review the inline comments in the function for detailed explanations of each potential error status and return value.
- The parameters of this function are:
-
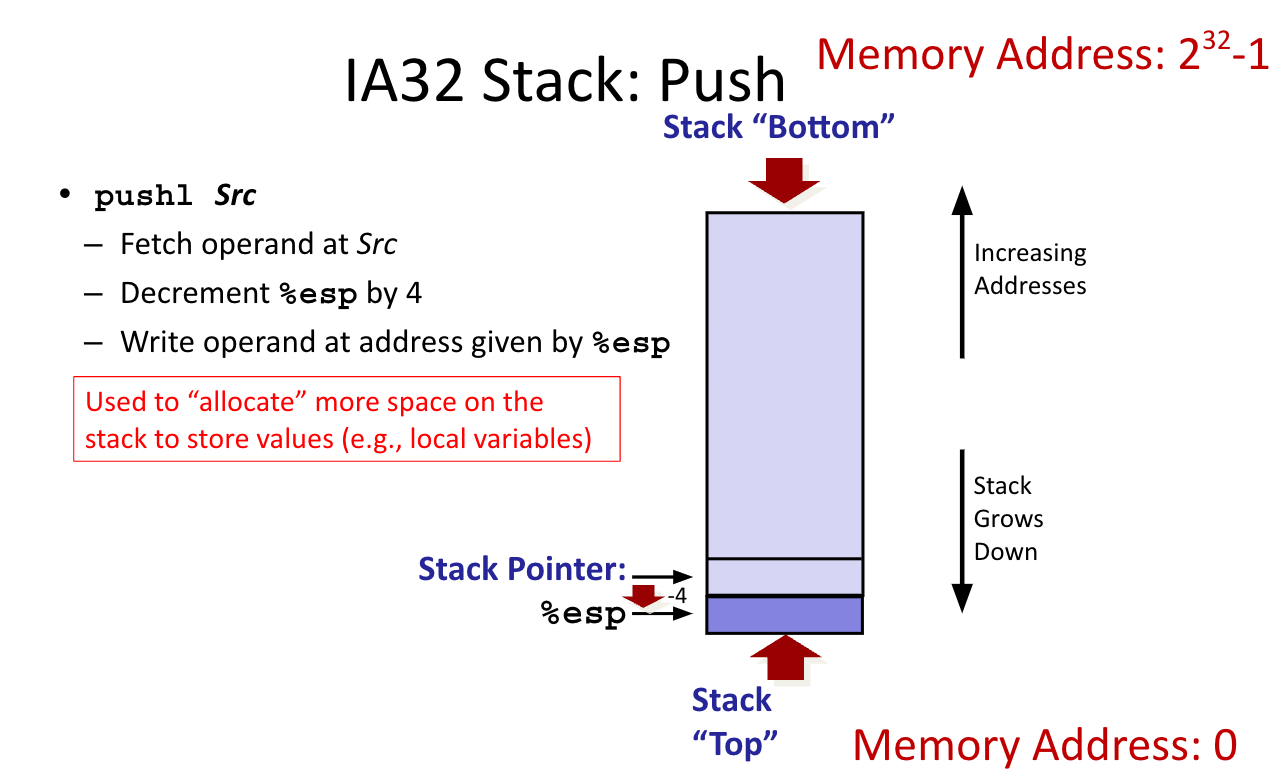
execute_push: this function validates and executes a pushl instruction, ensuring source operands is of known and appropriate type, and then performs the push operation if valid.- The parameters of this function are:
- A reference of the system desribed above.
- A string representing the source operand. This could be a register name, memory address, or immediate value.
- Here are the steps for implement pushl instruction:
- step 1: Fetch/Save the value at source operand,
- step 2: Decrement %esp by 4 to update top of stack
- Step 3: Write the value at address given by %esp
- You may review the animation in the slides for this algorithm.
- It returns
SUCCESSif there is no error.- Review the inline comments in the function for detailed explanations of each potential error status and return value.
- Review the inline comments in the function for detailed explanations of each potential error status and return value.
- The parameters of this function are:
-
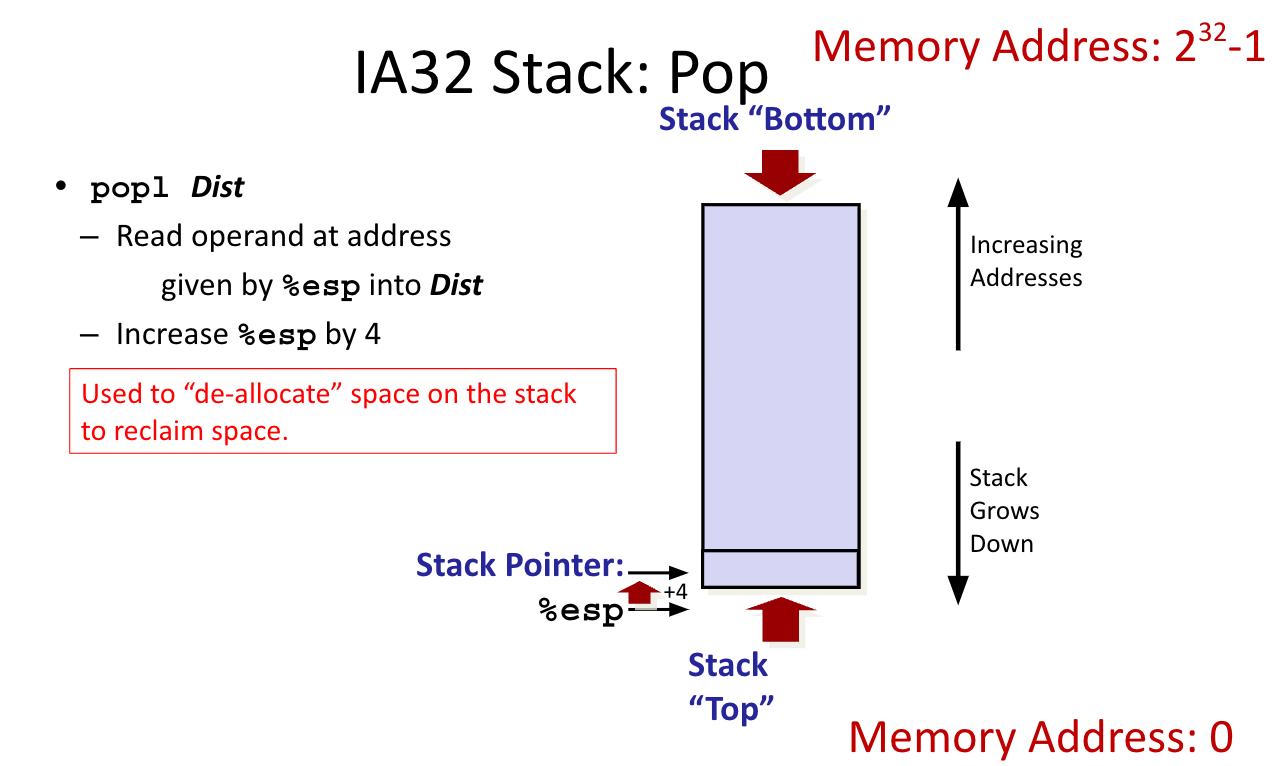
execute_pop: this function validates and executes a popl instruction, ensuring the destination operand is of known and appropriate type, and then performs the pop operation if valid- The parameters of this function are:
- A reference of the system desribed above.
- A string representing the destination operand. This could be a register name or memory address.
- Here are the steps for implement pushl instruction:
- step 1: Fetch/Save the value at the top of stack
- step 2: Write the value at destination operand
- It returns
SUCCESSif there is no error.- Review the inline comments in the function for detailed explanations of each potential error status and return value.
- Review the inline comments in the function for detailed explanations of each potential error status and return value.
- The parameters of this function are:
Part 3: Implement Functions for Each Assembly Instruction of Control operation
-
execute_cmpl: this function validates and executes a cmpl instruction, ensuring the destination operand is of known and appropriate type, and then performs the compare operation and updatecomparison_flagin the system if valid.- The parameters of this function are:
- A reference of the system desribed above.
- A string representing the source operand. This could be a register name, memory address, or immediate value.
- A string representing the destination operand. This could be a register name, memory address, or immediate value.
- It updates
comparison_flagin the system, and returnsSUCCESSif there is no error.- you have the flixiblity to implement
comparison_flagin any way that is logical. For example, if the value ineaxis different from the value inedx, after comparingeaxtoedx,comparison_flagshould hold a value that differs from the result of comparingedxtoeax. - Review the inline comments in the function for detailed explanations of each potential error status and return value.
- you have the flixiblity to implement
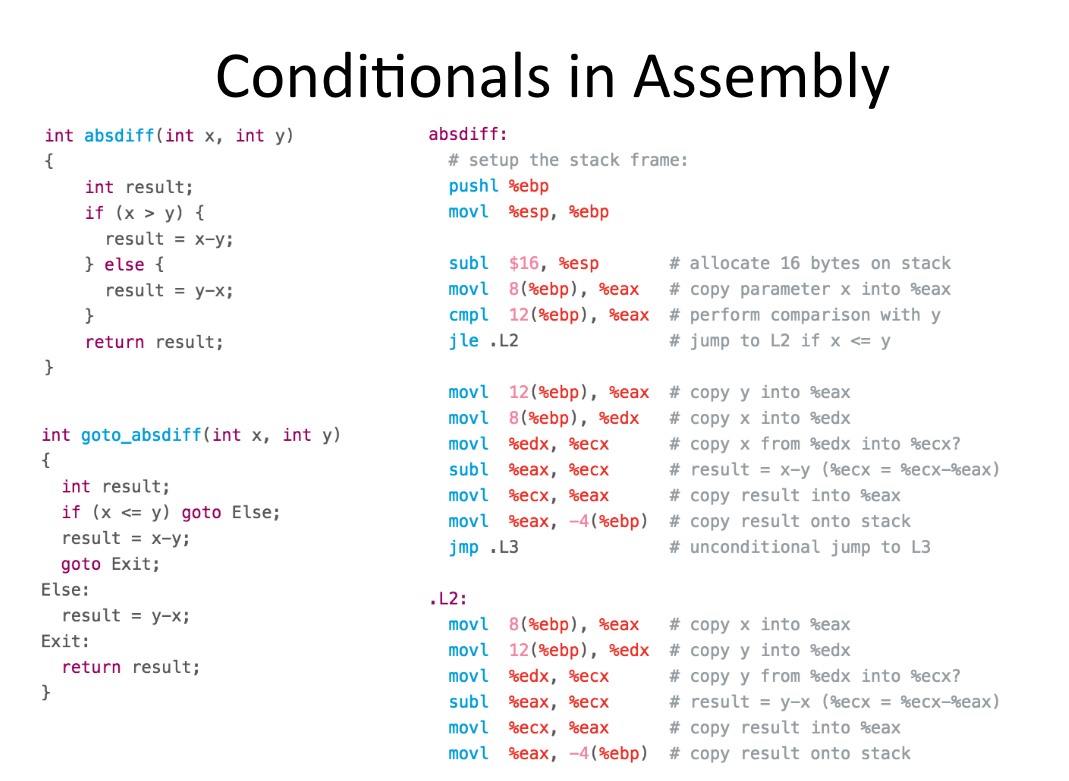
- Hint: we recommend you to review the conditionals example in the slides before implementing this function.
- The parameters of this function are:
-
execute_jmp: this function validates and executes a condition or direct jump instruction, ensuring the destination operands is of known label, and then performs the direct jump operation, or condition jump if condition is met.- The parameters of this function are:
- A reference of the system desribed above.
- A string representing the jump type. This could a direct jump (
JMP) or one of the conditional jumps (JE,JNE,JL,JG). - A string representing the destination label. This label should start with a
.and be located in the instruction segment of the system memory.
- It updates
EIPbased on whether condition met, and returnsSUCCESSif there is no error.- Review the inline comments in the function for detailed explanations of each potential error status and return value.
- Hint: we recommend you to review the conditionals example in the slides before implementing this function.
- The parameters of this function are:
-
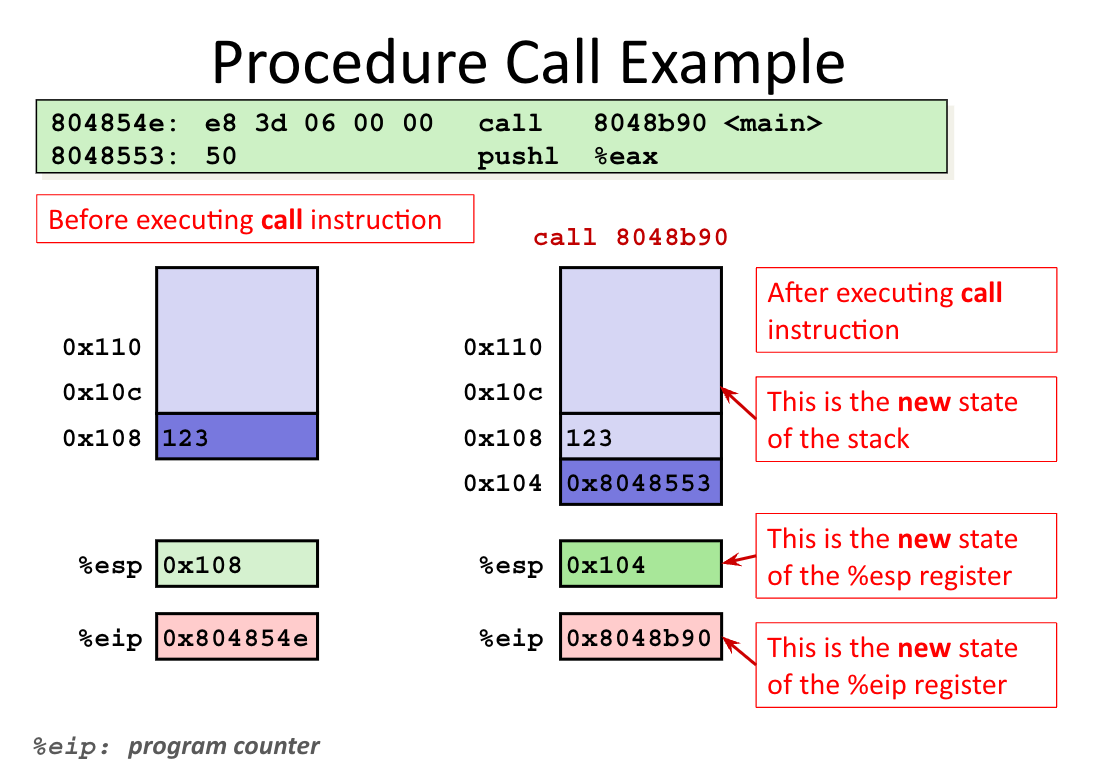
execute_call: this function validates and executes a call instruction, ensuring the destination operand is a known label, and then performs the call operation.- The parameters of this function are:
- A reference of the system desribed above.
- A string representing the destination label. This label should start with a . and be located in the instruction segment of the system memory.
- It updates registers and program counter (
EIP), and returnsSUCCESSif there is no error.- Review the inline comments in the function for detailed explanations of each potential error status and return value.
- Review the inline comments in the function for detailed explanations of each potential error status and return value.
- The parameters of this function are:
-
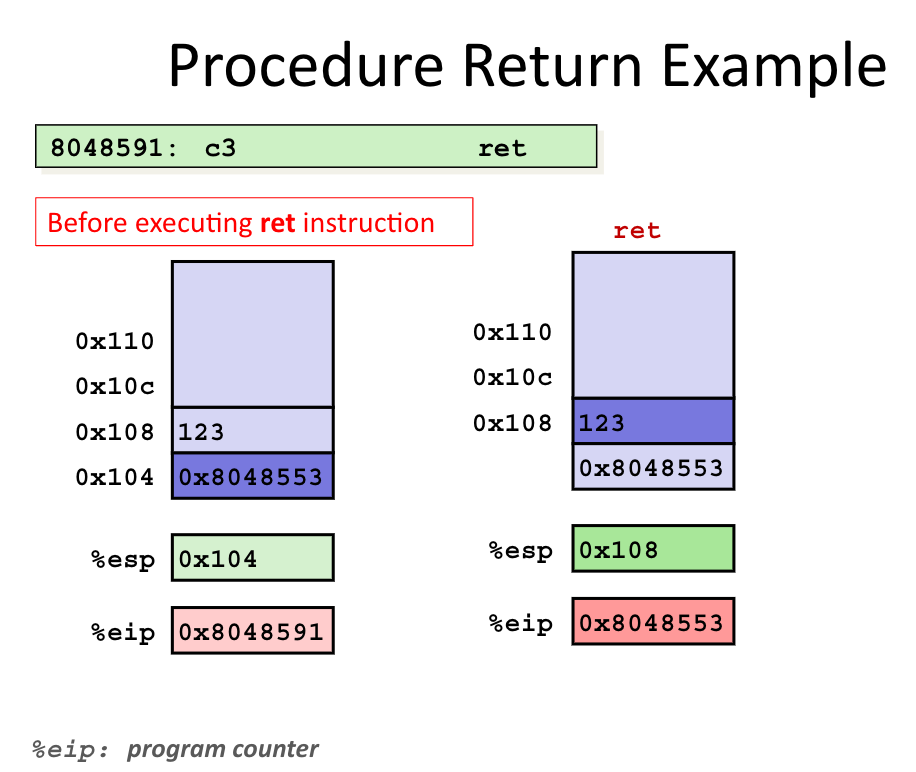
execute_ret: this function validates and executes a return instruction, which pops the return address from the stack and updateEIP(program counter).- The parameter of this function is:
- A reference of the system desribed above.
- It updates registers and program counter (
EIP), and returnsSUCCESSif there is no error.- Review the inline comments in the function for detailed explanations of each potential error status and return value.
- Review the inline comments in the function for detailed explanations of each potential error status and return value.
- The parameter of this function is:
Part 4: Implement An Execution Simulation Function
The third part of this assignment is to write the function execute_instructions in the file
src/interpreter.c. Utilizing the EIP register’s value (also known as the program counter),
this function is responsible for fetching and executing instructions from the instruction segment in system memory.
-
Step 1: The function starts by fetching instructions from the memory at the address indicated by the EIP register.
- Step 2: It then identifies the type of instruction, which can be one of
MOVL,ADDL,PUSHL,POPL,CMPL,CALL,RET,JMP, and executes it using the corresponding execute function implemented in Part 2.- In this function, don’t forget to update the the register
EIPin order to simulate program counter forMOVL,ADDL,PUSHL,POPL, andCMPL.
- In this function, don’t forget to update the the register
-
Step 3: The process continues in a loop, with the function fetching and executing the next instruction based on the updated EIP register, until one of the following conditions is met:
- An instruction returns an ERROR status, indicating an issue that halts further execution.
- The
ENDinstruction is encountered, signaling the end of the program.
- The function should ignore any instructions not listed above, i.e., labels, and continue fetching and executing the next one.
Debugging Help
It is important that you use the gdb debugger to debug your code
when you encounter problems. You can easily start the gdb debugger
from the command line:
$ gdb PROGRAM
Where PROGRAM is the program you compiled. You should look at the
provided gdb cheatsheet to see some of the commands you can
execute. If you need additional help you can take a look at this
tutorial.
You will inevitably encounter cases when your code fails a test or worse, the test program exits with a segmentation violation (segfault). To debug the code in a test requires you to understand how the google test framework generates C++ code and how the C++ compiler generates method signatures. In short, this is what you want to do:
$ gdb TEST_PROGRAM
(gdb) b TestSuite_TestName_Test::TestBody()
The SuiteName and TestName correspond to how you write a test
using the google test framework. In particular, this is the basic
structure of a test:
TEST(SuiteName, TestName) {
  // the test body
}
You should also know that the b (break) command provides tab
completion. So, you can type in the following:
(gdb) b TestSuite[TAB][TAB]
The [TAB] is hitting the tab key on your keyboard. You can hit it
twice in rapid succession to see all the possible completions.
Autograder
The autograder is used to test your code more deeply. If you follow the specifications of this exercise exactly then you should be able to pass all of the tests that you are provided and all of the tests the autograder is using to check your solution.
To run the autograder on your solution you must upload your
submission.zip file (generated by running make) to
Gradescope. More information about how to do this is provided below.
General Information and Project Policies
- Read this entire document. If, after a careful reading, something seems ambiguous or unclear to you, then communicate to the course staff immediately. Start this assignment as soon as possible. Do not wait until the night before the assignment is due to tell us you don’t understand something, as our ability to help you will be minimal.
- For some assignments, it will be useful for you to write additional
C++ files. Any C++ file you write that is used by your solution
MUST be in the provided
srcdirectory. - The course staff are here to help you figure out errors, but not solve them for you. When you submit your solution, be sure to remove all compilation errors from your project. Any compilation errors in your project will cause the autograder to fail, and you will receive a zero for your submission. No Exceptions!
- Reminder:
Academic Honesty
All work that is completed in this assignment is your own. You may talk to other students about the problems you are to solve, however, you may not share code in any way. What you submit *must be your own work.
You may not use any code that is posted on the internet. If you are not sure it is in your best interest to contact the course staff. We will be using software that will compare your code to other students in the course as well as online resources. It is very easy for us to detect similar submissions and will result in a failure for the exercise or possibly a failure for the course. Please, do not do this. It is important to be academically honest and submit your work only. Please review the UMass Academic Honesty Policy and Procedures so you are aware of what this means.
Copying partial or whole solutions, obtained from other students or elsewhere, is academic dishonesty. Do not share your code with your classmates, and do not use your classmates’ code. If you are confused about what constitutes academic dishonesty you should re-read the course policies. We assume you have read the course policies in detail and by submitting this project you have provided your virtual signature in agreement with these policies.
Gradescope
We use Gradescope to run our autograding software and record your grade for these assignments. You may submit this assignment as many times as possible up to the due date. If you encounter a problem with the autograder you should contact the course staff immediately.
Submission
You must submit the generated submission.zip file that is created by
running the make command to Gradescope. To do this you will need to
download the submission.zip file from the EdLab environment to your
local machine then upload submission.zip to Gradescope. Gradescope
will run your submission in our autograder environment and give you a
report of what tests passed and which did not. Again, you are welcome
to submit as many times as you would like.